How to Build an MCP Server in TypeScript: Step-by-Step Guide
Learn how to build a secure, production-ready Model Context Protocol (MCP) server in TypeScript using the v2 SDK. Master tools, resources, and prompts.
In this guide13 sectionsHide
Say your product has a REST API and a database full of customer data. You want an AI agent to work with it directly, whether that means looking something up, taking an action, or reporting back. Wiring up those capabilities for every agent takes work. And even then, you don't know how reliably an agent will use them until you test it with a real model.
The Model Context Protocol (MCP) gives you a standard way to expose those capabilities to AI agents.
This guide walks you through how to build an MCP server from scratch in TypeScript using the official v2 SDK and a real service layer for a fictional support product, SupportDesk. You'll expose it through local stdio and a stateless HTTP endpoint with bearer authentication, then verify the server with the MCPJam Inspector. By the end, you'll have a complete MCP server you can run locally and expose over HTTP.
The complete code is on GitHub if you want to try it yourself first.
What are we going to build?
We’re building an MCP server for SupportDesk, a fictional SaaS product where support reps track and resolve customer tickets.
The core application already knows how to search, retrieve, and update those tickets. Our goal is to expose those workflows to external AI agents.
An MCP server acts as an interface layer between AI agents and your application. When you add MCP to an existing product, keep this layer thin. It should expose the business logic, databases, and APIs you already have without reimplementing them.
The architecture looks like this:
AI agent → MCP server → SupportDesk service → ticket data.
Throughout this guide, you will implement the three core MCP primitives:
- Tools, which perform specific actions.
- Resources, which expose contextual read-only data.
- Prompts, which provide reusable interaction templates for the agents.
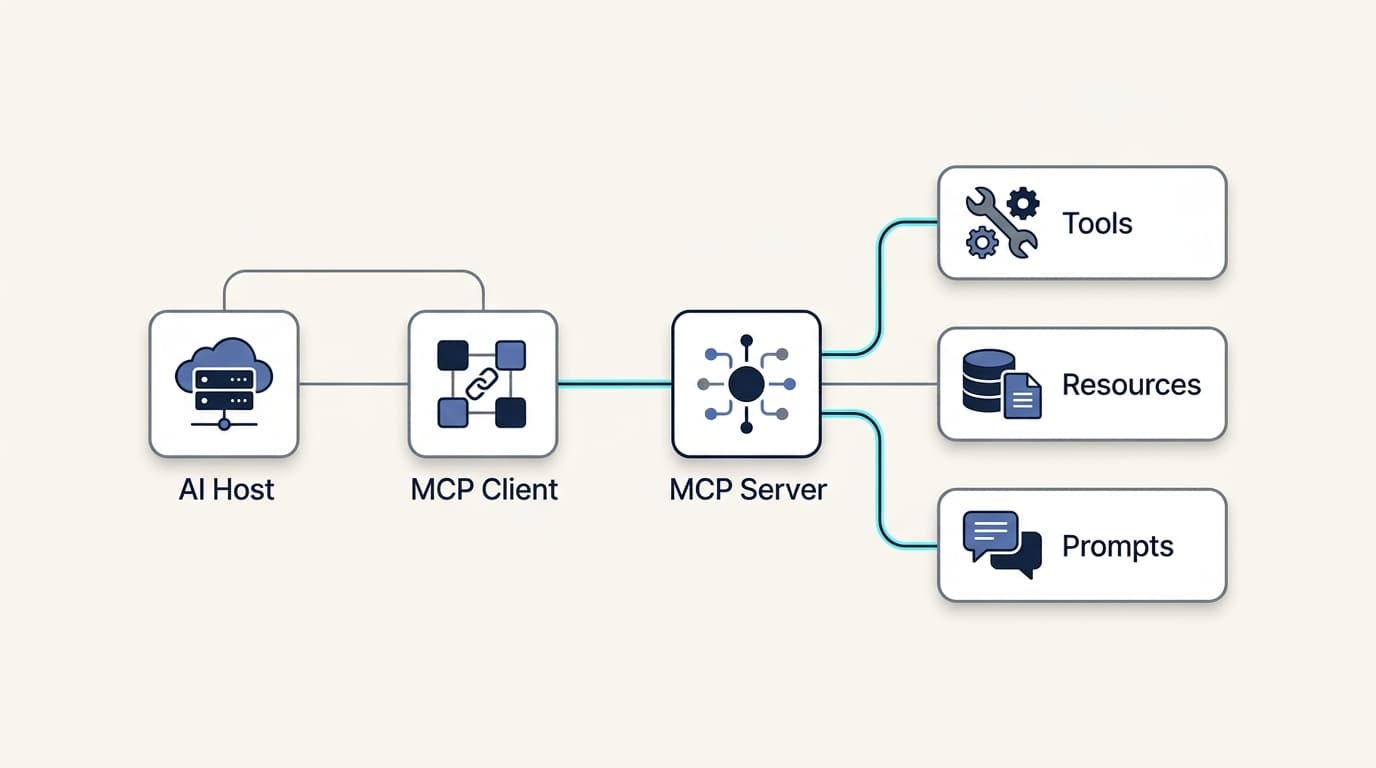
The goal is to build a working server with authentication, error handling, and caching in place, ready to run through the MCPJam Inspector.
Step 1: Set up the TypeScript project
Start by creating an empty directory for your project. The v2 SDK requires Node.js 20 or later.
Initialize the Node project and install SDK v2.0.0, Zod for validating tool inputs, and tsx to run TypeScript natively without a build step.
In this guide we will target the latest 2026-07-28 MCP protocol revision.
Scroll code horizontally →
mkdir supportdesk-mcp && cd supportdesk-mcp

npm init -y

npm install @modelcontextprotocol/[email protected] zod

npm install -D tsx typescript @types/node
Next, configure your package.json file to use ES Modules and add scripts for running the server and checking the TypeScript.
{
  "type": "module",
  "scripts": {
    "dev:stdio": "tsx src/stdio.ts",
    "dev:http": "tsx src/local-http.ts",
    "typecheck": "tsc --noEmit"
  }
}
Also configure TypeScript to resolve ES module imports correctly, and skip type-checking of declaration files so a dependency's own type definitions can't block your build.
Create a basic tsconfig.json file in your project root. This makes sure .js extension imports resolve correctly when run with tsx.
{
  "compilerOptions": {
    "module": "NodeNext",
    "moduleResolution": "NodeNext",
    "types": ["node"],
    "skipLibCheck": true
  }
}
Finally, set up a project structure that keeps your domain logic separate from your transport layers.
src/
  support-service.ts
  server.ts
  stdio.ts
  http.ts
  local-http.ts
The current stable package is @modelcontextprotocol/server. This SDK validates all incoming tool arguments against the Zod schemas you register, so your handlers never need to manually parse input types.
Step 2: Create the SupportDesk product layer
Build support-service.ts first. This keeps the SupportDesk business logic separate from the MCP protocol layer. The server just calls into it.
Add a small set of mock tickets with different statuses, priorities, and customers. This gives you predictable data and useful edge cases to test later.
Scroll code horizontally →
// src/support-service.ts

export interface Ticket {
  id: string;
  title: string;
  customer: string;
  status: "open" | "in_progress" | "resolved";
  priority: "low" | "medium" | "high";
  description: string;
}

// Seed varying mock ticket data
const tickets: Map<string, Ticket> = new Map([
  ["T-100", { id: "T-100", title: "Login failure", customer: "Acme Corp", status: "open", priority: "high", description: "User cannot log in via SSO." }],
  ["T-101", { id: "T-101", title: "Billing report bug", customer: "Globex", status: "in_progress", priority: "medium", description: "Exported PDF is missing the total column." }],
  ["T-102", { id: "T-102", title: "Update API keys", customer: "Acme Corp", status: "resolved", priority: "low", description: "Rotated production API keys." }]
]);

export function searchTickets(query?: string, status?: string, priority?: string): Ticket[] {
  return Array.from(tickets.values()).filter(t => {
    const matchQuery = query ? t.title.toLowerCase().includes(query.toLowerCase()) : true;
    const matchStatus = status ? t.status === status : true;
    const matchPriority = priority ? t.priority === priority : true;
    return matchQuery && matchStatus && matchPriority;
  });
}

export function getTicket(id: string): Ticket | undefined {
  return tickets.get(id);
}

export function updateTicketStatus(id: string, status: "open" | "in_progress" | "resolved"): Ticket | undefined {
  const ticket = tickets.get(id);
  if (!ticket) return undefined;
  ticket.status = status;
  return ticket;
}

export function getQueueSummary() {
  const all = Array.from(tickets.values());
  return {
    open: all.filter(t => t.status === "open").length,
    in_progress: all.filter(t => t.status === "in_progress").length,
    resolved: all.filter(t => t.status === "resolved").length,
    high_priority: all.filter(t => t.priority === "high").length
  };
}
getTicket() returns undefined when a ticket doesn’t exist, and updateTicketStatus() returns the updated ticket so the caller can confirm what changed.
Handling missing tickets cleanly and returning the updated state becomes especially important when an agent is calling these functions.
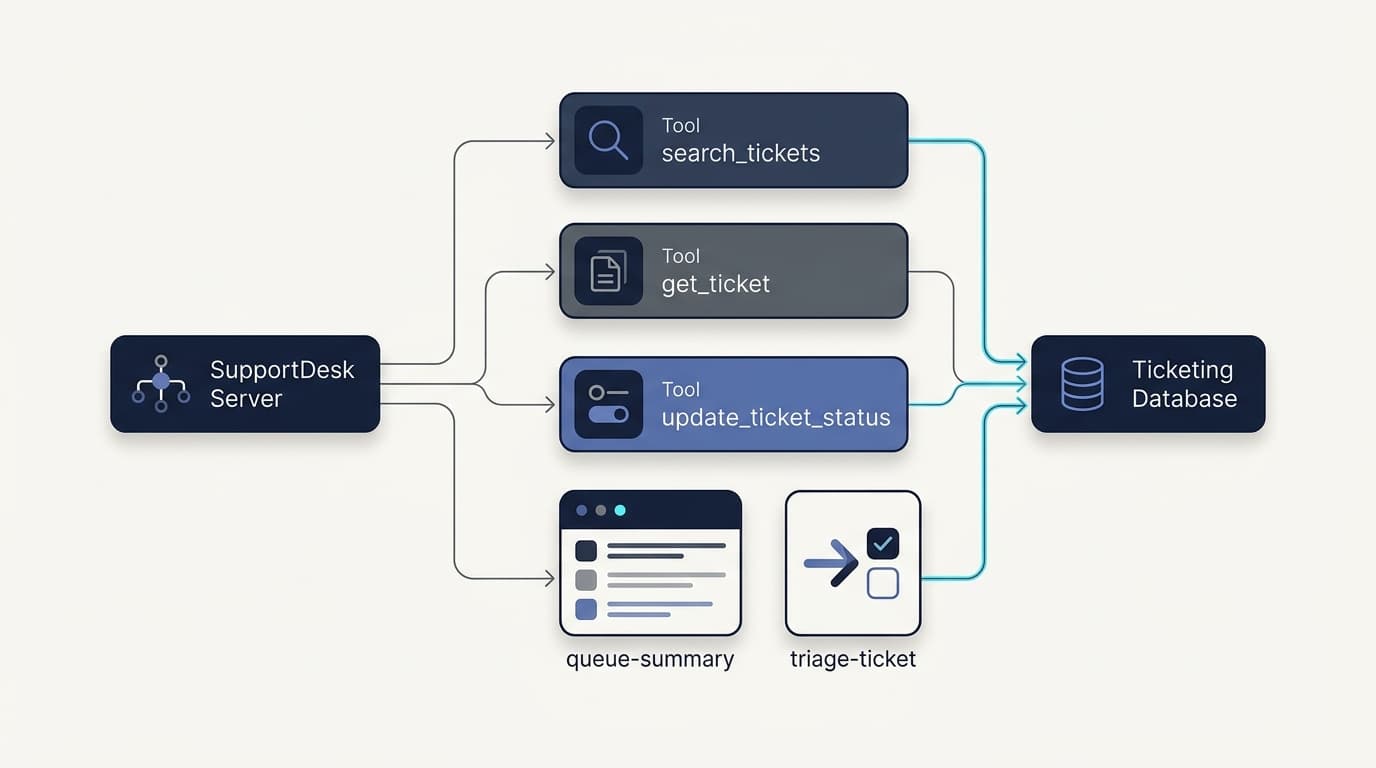
Step 3: Create the MCP server factory
Create a createServer() factory function using the McpServer class. Define an AppContext interface so that authentication state can be routed per request.
Keeping product state outside the McpServer instance lets the same factory serve local stdio connections during development and HTTP requests in production, without either transport leaking state into the other.
Scroll code horizontally →
// src/server.ts
import { McpServer, ResourceNotFoundError, ResourceTemplate } from "@modelcontextprotocol/server";
import { z } from "zod";
import * as supportService from "./support-service.js";

export interface AppContext {
  authInfo?: {
    scopes: string[];
  };
  http?: {
    authInfo?: {
      scopes: string[];
    };
  };
}

function scopesFromContext(context: AppContext | undefined): string[] | undefined {
  return context?.http?.authInfo?.scopes ?? context?.authInfo?.scopes;
}

export function createServer() {
  const server = new McpServer({
    name: "SupportDesk",
    version: "1.0.0"
  }, {
    instructions: "Use search_tickets before get_ticket unless the user already provided an exact ticket ID. Only update ticket status when the caller is authorized for tickets:write."
  });

  // Tools, Resources, and Prompts will be registered here

  return server;
}
Server instructions guide how the agent behaves, but they don't enforce authorization. They tell the agent to search before looking up a specific ticket, unless the user already gave an exact ID, and they flag that writes need authorization.
The real enforcement happens in code. The update_ticket_status handler you'll add in Step 4 checks the caller's scope before it lets a write through. scopesFromContext() reads both the top-level and HTTP request auth shapes. When neither is present, as on a local stdio session, it returns undefined and the write is allowed. When a token is attached, the handler requires tickets:write.
Step 4: Add MCP tools
Tools let an agent call functions in your product to retrieve data or take actions on the user's behalf.
Add the search_tickets tool
Start with a read-only tool that searches tickets using optional filters. A clear description helps the agent understand when to search instead of attempting a direct lookup.
Scroll code horizontally →
  server.registerTool(
    "search_tickets",
    {
      description: "Search for support tickets by query, status, or priority.",
      annotations: { readOnlyHint: true },
      inputSchema: {
        query: z.string().optional().describe("Text to search in the ticket title"),
        status: z.enum(["open", "in_progress", "resolved"]).optional(),
        priority: z.enum(["low", "medium", "high"]).optional()
      }
    },
    async (args) => {
      const results = supportService.searchTickets(args.query, args.status, args.priority);
      return {
        content: [{ type: "text", text: JSON.stringify(results, null, 2) }]
      };
    }
  );
The readOnlyHint: true annotation tells clients the operation won't modify state. MCP clients receive this schema, and the SDK validates all input against it before your handler runs. This tool is a good one to evaluate later. Does the agent reach for search_tickets when a request is vague, like "find tickets about login failures," or does it try to guess a ticket ID instead?
Add the get_ticket tool
Next, add a lookup tool that retrieves a ticket by its exact ID. Keep search_tickets and get_ticket separate because they serve different purposes.
One finds tickets matching loose criteria, while the other retrieves one ticket you already know the ID for. Collapsing them into a single tool would force the agent to guess which mode you meant.
Scroll code horizontally →
  server.registerTool(
    "get_ticket",
    {
      description: "Retrieve a specific support ticket by its exact ID.",
      annotations: { readOnlyHint: true },
      inputSchema: {
        id: z.string().describe("The exact ticket ID (e.g., T-100)")
      }
    },
    async (args) => {
      const ticket = supportService.getTicket(args.id);
      if (!ticket) {
        return {
          isError: true,
          content: [{ type: "text", text: `Error: Ticket ID ${args.id} not found.` }]
        };
      }
      return {
        content: [{ type: "text", text: JSON.stringify(ticket, null, 2) }]
      };
    }
  );
If the ticket doesn't exist, this returns isError: true with a clear message. That gives the agent a structured failure it can relay honestly, like telling the user "T-999 doesn't exist," instead of hallucinating a ticket or crashing the conversation.
Add the update_ticket_status tool
This is the first tool that changes data. On HTTP it is gated behind an authorization check. A local stdio session has no bearer token, so that check does not run there.
Scroll code horizontally →
server.registerTool(
    "update_ticket_status",
    {
      description: "Update the status of a specific support ticket.",
      annotations: { destructiveHint: true },
      inputSchema: {
        id: z.string(),
        status: z.enum(["open", "in_progress", "resolved"])
      }
    },
    async (args, context: AppContext) => {
      // HTTP attaches a bearer token. Stdio does not, so local Inspector runs can
      // exercise the write. A present token must include tickets:write.
      const scopes = scopesFromContext(context);
      if (scopes !== undefined && !scopes.includes("tickets:write")) {
        throw new Error("Unauthorized: tickets:write scope is missing.");
      }

      const updated = supportService.updateTicketStatus(args.id, args.status);
      if (!updated) {
        return {
          isError: true,
          content: [{ type: "text", text: `Error: Cannot update. Ticket ${args.id} not found.` }]
        };
      }
      return {
        content: [{ type: "text", text: `Success. Ticket updated:\n${JSON.stringify(updated, null, 2)}` }]
      };
    }
  );
The destructiveHint: true annotation signals that this tool may make significant changes. Clients may use that to prompt for confirmation, but nothing requires it. The scope check inside the handler is what actually blocks an unauthorized write, and it runs only when a token is present.
The handler also returns the full updated ticket, so the agent can verify exactly what changed. On stdio there is no token, so scopes is undefined and the update succeeds. On HTTP, call it with a read-only token. The code above returns a clear "Unauthorized" error instead of failing silently.
Step 5: Add MCP resources
Resources are read-only, like search_tickets and get_ticket, but clients access them differently. An agent calls a tool with arguments, while a client retrieves a resource through its URI. A client can list it, subscribe to it, cache it, and pull it into context without the agent making an explicit call.
Add the support://queue-summary resource
Create a read-only static resource that returns aggregate counts of the ticket queue.
Scroll code horizontally →
  server.registerResource(
    "queue-summary",
    "support://queue-summary",
    {
      description: "Summary of the support queue",
      mimeType: "application/json",
      cacheHint: { ttlMs: 60000, cacheScope: "public" }
    },
    async () => {
      const summary = supportService.getQueueSummary();
      return {
        contents: [{
          uri: "support://queue-summary",
          mimeType: "application/json",
          text: JSON.stringify(summary, null, 2)
        }]
      };
    }
  );
The 2026-07-28 protocol revision requires ttlMs and cacheScope on cacheable results, so a long conversation doesn’t hammer your backend with the same read over and over.
ttlMs sets how long (in milliseconds) a client may cache the payload before requesting a fresh copy. It’s 60 seconds here. cacheScope: "public" means this aggregate data can be cached by shared caches. Use "private" for user-specific results.
Add the support://tickets/{id} resource template
Add a resource template for looking up individual tickets. This reuses the same lookup logic as get_ticket, exposed as a resource instead of a tool.
Scroll code horizontally →
  server.registerResource(
    "ticket-lookup",
    new ResourceTemplate("support://tickets/{id}", { list: undefined }),
    {
      description: "Look up a support ticket by ID",
      mimeType: "application/json",
      cacheHint: { ttlMs: 30000, cacheScope: "private" }
    },
    async (uri, variables) => {
      const id = String(variables.id);
      const ticket = supportService.getTicket(id);
      if (!ticket) {
        throw new ResourceNotFoundError(uri.href, `Resource not found: Ticket ${id}`);
      }
      return {
        contents: [{
          uri: uri.href,
          mimeType: "application/json",
          text: JSON.stringify(ticket, null, 2)
        }]
      };
    }
  );
A client can request a specific ticket URI directly and get the record back as context. Unknown ticket IDs throw ResourceNotFoundError, which identifies the failure as a missing resource rather than a generic JavaScript error.
Step 6: Add the triage-ticket MCP prompt
Prompts are reusable message templates that clients can expose to users by name. Register one that accepts a specific ticket ID.
Scroll code horizontally →
  server.registerPrompt(
    "triage-ticket",
    {
      description: "Instructions for triaging a specific support ticket.",
      argsSchema: {
        id: z.string().describe("The ticket ID to triage")
      }
    },
    async (args) => {
      return {
        messages: [
          {
            role: "user",
            content: {
              type: "text",
              text: `Please review ticket ${args.id}. Assess its urgency, summarize the core issue, and propose a next action for the support team.`
            }
          }
        ]
      };
    }
  );
Keep prompts like this focused on one task. This one gives the user a clear starting point for triaging a specific ticket, rather than a vague template they'd have to fill in themselves.
Step 7: Run the MCP server locally over stdio
Add the local stdio entry point. Stdio transport is appropriate when a client, such as a desktop application or a CLI tool, launches the server process directly on the user's machine.
Scroll code horizontally →
// src/stdio.ts
import { serveStdio } from "@modelcontextprotocol/server/stdio";
import { createServer } from "./server.js";

const server = createServer();

async function run() {
  await serveStdio(() => server, { legacy: "reject" });
}

run().catch(console.error);
Critical rule: Never write arbitrary application output or debugging data to stdout using console.log(). Stdout is JSON-RPC traffic only, so standard logging will silently corrupt the data stream. Route all debugging diagnostics to stderr using console.error().
Passing legacy: "reject" makes the stdio entry point modern-only for the 2026-07-28 protocol revision. Older protocol clients will receive an unsupported-protocol-version response. Use a current MCP client or Inspector that supports protocol negotiation. This gives you a local target to point the MCPJam Inspector at without deploying anything.
Step 8: Expose the same server over HTTP
Add a second entry point to expose the same underlying SupportDesk implementation to remote MCP clients over the internet.
This first pass only handles transport and host validation, so you can see that part in isolation. Step 9 replaces this file wholesale with a version that adds bearer authentication in front of it. If you're following along by pasting code in, treat this snippet as a checkpoint you'll overwrite, not as a second file to keep around.
Scroll code horizontally →
// src/http.ts
import { createMcpHandler, hostHeaderValidationResponse } from "@modelcontextprotocol/server";
import { createServer } from "./server.js";

// createMcpHandler calls this factory for each HTTP request, so return a fresh
// McpServer instance. Shared app dependencies should live outside this factory.
const mcpHandler = createMcpHandler(() => createServer(), { legacy: "reject" });

// Example using standard Web Fetch API (e.g., Cloudflare Workers, Bun, Deno)
export default {
  async fetch(request: Request) {
    const url = new URL(request.url);
    if (url.pathname === "/mcp") {

      // Perform essential host header validation
      const hostValidation = hostHeaderValidationResponse(request, ["api.supportdesk.com", "localhost", "127.0.0.1"]);
      if (hostValidation instanceof Response) {
        return hostValidation; // Returns 400 Bad Request if host header is invalid
      }

      return mcpHandler.fetch(request);
    }
    return new Response("Not Found", { status: 404 });
  }
};
The v2 handler serves 2026-07-28 traffic one request at a time without maintaining an MCP session between calls. Passing legacy: "reject" ensures only modern API paths are hit, dropping legacy stateful session support. Migrating to the stateless design of the 2026-07-28 protocol revision is required for future protocol features and simpler edge deployments.
Every incoming request gets its own short-lived server. The tickets themselves live in one shared store, so those servers all read and update the same data. The caller's permissions apply only to that request, and the next request starts clean.
The handler is validation-free by design. Implement Host and Origin validation in front of it yourself. The SDK doesn’t do this for you. Skip host header validation, and a request with a forged Host header can get routed to your handler as if it came from a trusted origin.
This is Server-Side Request Forgery (SSRF). It means using a trusted server as a proxy to reach systems that would otherwise refuse the request directly.
Step 9: Protect the HTTP server with bearer authentication
Add an authentication layer around the HTTP endpoint. This implements enough resource-server behavior to make authorization flows testable, without turning this into a full OAuth identity tutorial.
Use the SDK's built-in bearer-auth helpers with a local development token verifier and two conceptual scopes, tickets:read and tickets:write.
The snippet below is the final version of src/http.ts. Replace the entire file from Step 8 with this.
It keeps the same host-validation and fetch-handler shape and adds a requireBearerAuth import, a mockTokenVerifier/gate pair, and a check that runs gate(request) before mcpHandler.fetch() is ever called.
The host allowlist is also narrower here, since this version is scoped to local testing.
Scroll code horizontally →
// src/http.ts
import { createMcpHandler, requireBearerAuth, hostHeaderValidationResponse } from "@modelcontextprotocol/server";
import { createServer } from "./server.js";

// createMcpHandler calls this factory for each HTTP request, so return a fresh
// McpServer instance. Shared app dependencies should live outside this factory.
const mcpHandler = createMcpHandler(() => createServer(), { legacy: "reject" });

const mockTokenVerifier = {
  async verifyAccessToken(token: string) {
   // Expires 1 hour from now. The SDK expects seconds since epoch, not milliseconds.
    const expiresAt = Math.floor(Date.now() / 1000) + 3600;

    if (token === "dev-read-token") {
      return { scopes: ["tickets:read"], expiresAt, token, clientId: "mock-client" };
    }
    if (token === "dev-write-token") {
      return { scopes: ["tickets:read", "tickets:write"], expiresAt, token, clientId: "mock-client" };
    }
    throw new Error("Invalid token"); // Triggers an automatic 401 response
  }
};

const gate = requireBearerAuth({
  verifier: mockTokenVerifier,
  requiredScopes: ["tickets:read"] // Base requirement to connect
});

export default {
  async fetch(request: Request) {
    const url = new URL(request.url);
    if (url.pathname === "/mcp") {

      // Allowlist scoped to local testing only; add your production hostname (e.g. "api.supportdesk.com") back in before deploying
      const hostValidation = hostHeaderValidationResponse(request, ["localhost", "127.0.0.1"]);
      if (hostValidation instanceof Response) return hostValidation;

      // Protect the endpoint using standard bearer authentication
      let authResult: Awaited<ReturnType<typeof gate>>;
      try {
        authResult = await gate(request);
      } catch {
        return new Response("Invalid token", {
          status: 401,
          headers: {
            "WWW-Authenticate": 'Bearer error="invalid_token", error_description="Invalid token"'
          }
        });
      }

      if (authResult instanceof Response) {
        if (authResult.status >= 500) {
          return new Response("Invalid token", {
            status: 401,
            headers: {
              "WWW-Authenticate": 'Bearer error="invalid_token", error_description="Invalid token"'
            }
          });
        }
        return authResult; // Returns standard 401 or 403 challenge response
      }

      // Securely pass the verified auth info directly into the handler context
      return mcpHandler.fetch(request, { authInfo: authResult as any });
    }
    return new Response("Not Found", { status: 404 });
  }
};
Note the expiresAt property in the mocked response. The SDK rejects tokens that lack an expiration date. Forcing an expiration bounds how long a token stays valid, so a leaked or stale token cannot be used indefinitely. This doesn't handle revocation. Cutting off access before a token naturally expires requires a separate check against your identity provider.
The try/catch around gate(request) exists because verifyAccessToken() throws on an invalid token, and an uncaught throw there would otherwise surface as a raw error instead of a clean 401. The additional check on authResult.status normalizes any 500-level failure from the auth helper itself into the same clean 401, so a client always gets a standard challenge response instead of an opaque server error.
In production, this code should validate against a real identity provider, such as Auth0 or Okta. MCP server authorization works the same way as authorizing any standard web API with access tokens. Try no token, an invalid token, and a valid-but-under-scoped token, and confirm each fails in a distinct, legible way.
For local HTTP testing, wrap the Fetch-style handler with Node's HTTP server.
Scroll code horizontally →
// src/local-http.ts
import { createServer as createHttpServer } from "node:http";
import mcpApp from "./http.js";

const port = Number(process.env.PORT ?? 8787);

async function readBody(request: import("node:http").IncomingMessage) {
  const chunks: Buffer[] = [];
  for await (const chunk of request) {
    chunks.push(Buffer.isBuffer(chunk) ? chunk : Buffer.from(chunk));
  }
  return Buffer.concat(chunks);
}

const server = createHttpServer(async (nodeRequest, nodeResponse) => {
  try {
    const host = nodeRequest.headers.host ?? `localhost:${port}`;
    const url = new URL(nodeRequest.url ?? "/", `http://${host}`);
    const headers = new Headers();

    for (const [key, value] of Object.entries(nodeRequest.headers)) {
      if (Array.isArray(value)) {
        headers.set(key, value.join(", "));
      } else if (value !== undefined) {
        headers.set(key, value);
      }
    }

    const method = nodeRequest.method ?? "GET";
    const body = method === "GET" || method === "HEAD" ? undefined : await readBody(nodeRequest);
    const request = new Request(url, {
      method,
      headers,
      body: body && body.length > 0 ? body : undefined
    });

    const response = await mcpApp.fetch(request);
    nodeResponse.statusCode = response.status;
    response.headers.forEach((value, key) => nodeResponse.setHeader(key, value));

    const responseBody = Buffer.from(await response.arrayBuffer());
    nodeResponse.end(responseBody);
  } catch (error) {
    console.error(error);
    nodeResponse.statusCode = 500;
    nodeResponse.end("Internal Server Error");
  }
});

server.listen(port, () => {
  console.error(`SupportDesk MCP HTTP server listening on http://localhost:${port}/mcp`);
});
Run the local HTTP endpoint with the following command.
npm run dev:httpConnect clients to http://localhost:8787/mcp with Authorization: Bearer dev-read-token for read-only tests or Authorization: Bearer dev-write-token for update tests.
Before opening a full inspector UI, you can confirm that the HTTP endpoint is alive from the terminal. First, check that the auth gate is active.
curl -i http://localhost:8787/mcpYou should receive a 401 Unauthorized response with a missing authorization header message. That is expected. It confirms that the endpoint is reachable and rejects unauthenticated requests.
Then send a real MCP request to list the registered tools.
Scroll code horizontally →
curl -sS -X POST http://localhost:8787/mcp \
  -H 'Authorization: Bearer dev-read-token' \
  -H 'Content-Type: application/json' \
  -H 'Accept: application/json, text/event-stream' \
  -H 'MCP-Protocol-Version: 2026-07-28' \
  -H 'Mcp-Method: tools/list' \
  -d '{"jsonrpc":"2.0","id":1,"method":"tools/list","params":{"_meta":{"io.modelcontextprotocol/protocolVersion":"2026-07-28","io.modelcontextprotocol/clientCapabilities":{},"io.modelcontextprotocol/clientInfo":{"name":"curl-smoke-test","version":"1.0.0"}}}}'
Swipe to inspect the full diagram →
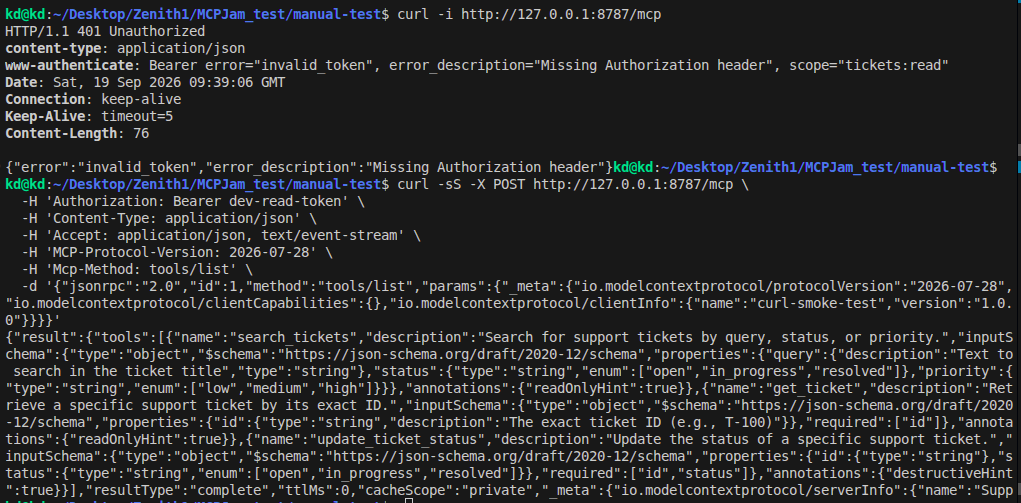
The response should include search_tickets, get_ticket, and update_ticket_status. That proves the HTTP transport, bearer auth, modern MCP headers, and tool registration are all working together.
Step 10: Connect the finished server to the MCPJam Inspector
Finish the build with a smoke test to confirm the server compiles, negotiates the protocol, and responds correctly.
Run the MCPJam Inspector locally on your machine. It's MCPJam's open-source tool for inspecting and testing MCP servers.
Scroll code horizontally →
npx -y @mcpjam/inspector@latest --no-open npx tsx "$PWD/src/stdio.ts"Run this command from the supportdesk-mcp project directory. The "$PWD/src/stdio.ts" path is intentional. Without an absolute path, the Inspector may look for src/stdio.ts inside its own temporary npx directory instead of your project, and fail to find it.
If the terminal prints MCPJam's banner and says the MCP server will auto-connect on startup, that means the Inspector accepted the stdio launch command. Some Inspector versions don’t print a browser URL when --no-open is used; in that case, open http://localhost:6274 manually.
Because the stdio entry point rejects legacy protocol openings, use the latest Inspector build for 2026-07-28 support. Once it connects, verify that the Inspector discovers:
- 3 specific tools: search_tickets, get_ticket, and update_ticket_status
- 1 static resource, support://queue-summary
- 1 resource template, support://tickets/{id}
- 1 interactive prompt, triage-ticket
- Server metadata and instructions
- Protocol version 2026-07-28 and transport type
Swipe to inspect the full diagram →
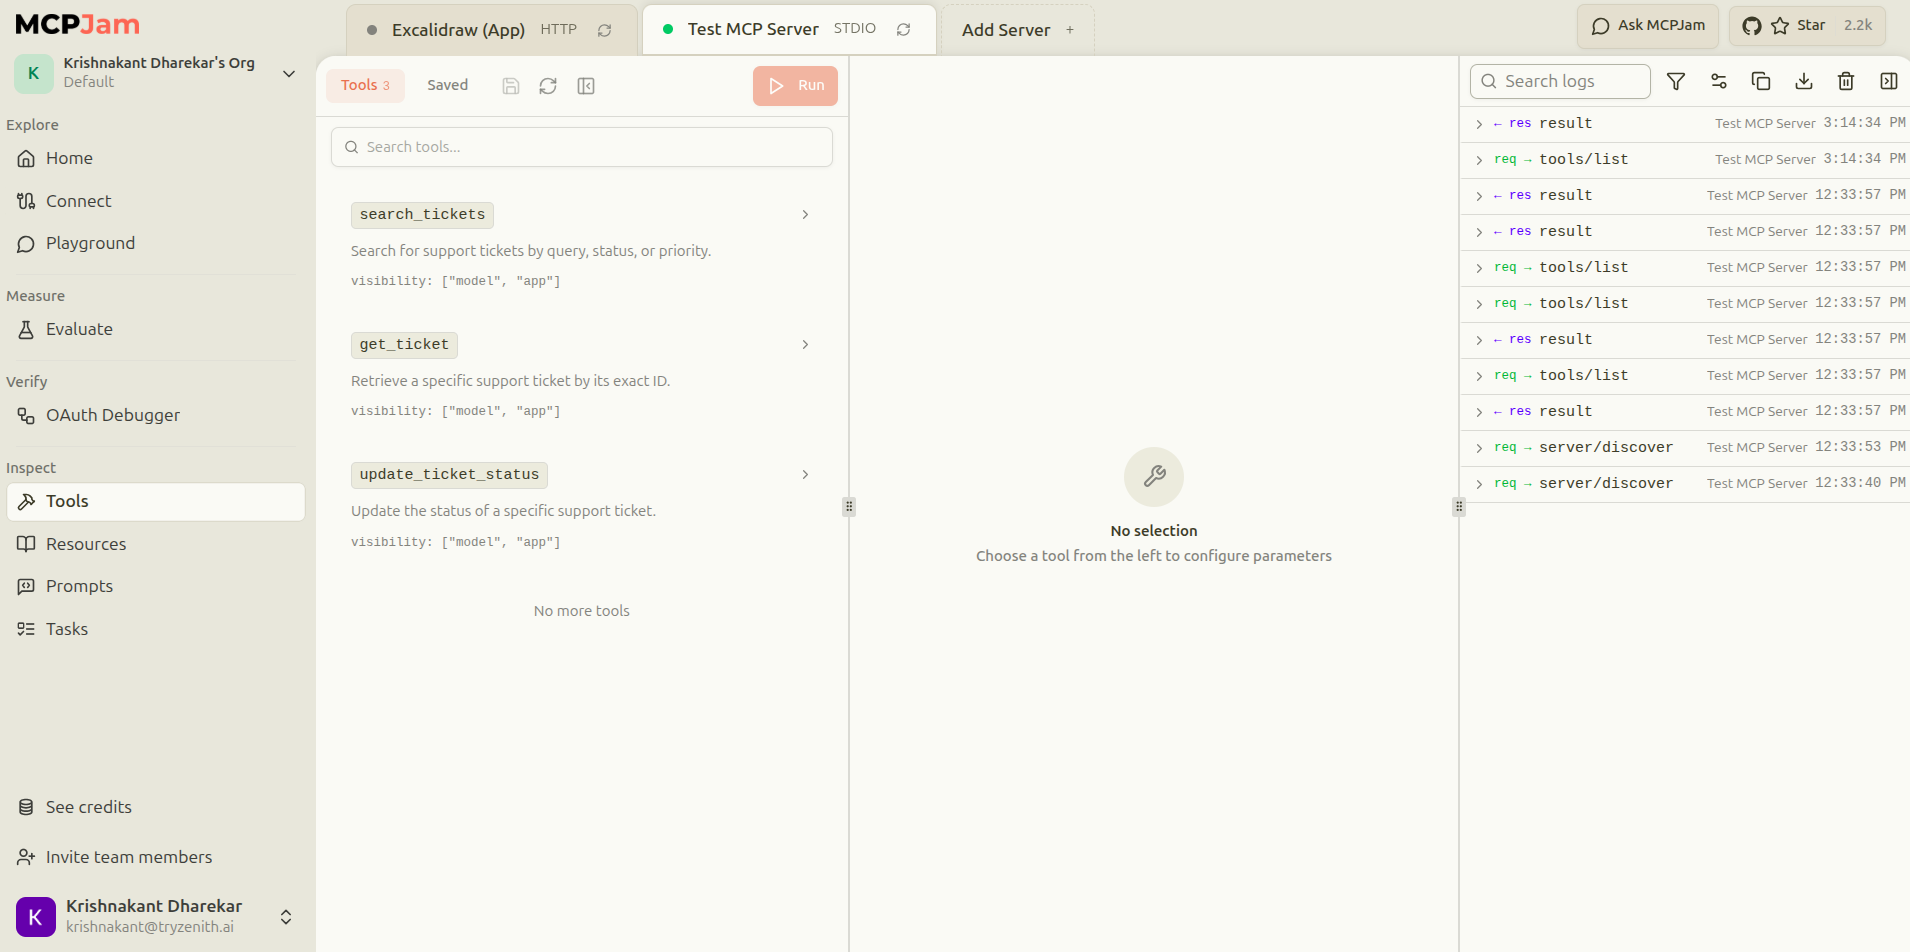
Call search_tickets once, read support://queue-summary, read support://tickets/T-100, and fetch the triage-ticket prompt. If each responds as expected, you've verified that your tools, resources, and prompt are accessible through the finished server.
What this smoke test doesn't prove
What you just did is protocol-level validation, confirming the server responds correctly to calls with known arguments. MCP Inspector V2 is useful for the same kind of manual or scripted protocol testing. It doesn't tell you whether a model can interpret a user's request, choose the right tool, and supply the right arguments.
Testing that requires putting a model in the loop and letting it decide what to call on its own. That's what we go through in Part 2 of this guide series. There, we'll use MCPJam to run automated evaluations against the same server.
Swipe to see all columns →
| Platform | Target Lifecycle | What it actually tests |
|---|---|---|
| MCP Inspector V2 | Local Developer Smoke Testing | You call a tool with known arguments and confirm the server responds correctly. |
| MCPJam | Continuous Pre-Production Reliability | A real model receives your prompt and decides which tool to call and what to pass. MCPJam records whether it made the right call, then repeats that check across clients and in CI. |
How do you adapt this MCP server to your own product?
To adapt this pattern to your own SaaS product, follow this pipeline.
existing APIs → selected MCP primitives → schemas/permissions → transport → AI agents.
Don’t expose every REST endpoint through MCP. Start with the user workflows where an agent has a clear reason to read data or act on the user's behalf. Keep your domain logic in the application layer, as described in Step 2. That keeps the MCP implementation a thin interface instead of a second copy of your product that's easy to get out of sync.
What's next? In Part 2, we will use MCPJam to put a real model in the loop and run automated evaluations against this SupportDesk server. We'll test whether it chooses the right tools, passes the right arguments, respects authorization boundaries, and behaves reliably across multiple AI hosts.
Frequently Asked Questions
Should an MCP server contain my application's business logic?
No. Your server should be a thin routing layer over logic you already have. Keeping domain logic separate from the protocol layer is what keeps the server testable and transport-agnostic.
Should I use stdio or HTTP for my MCP server?
Use stdio for local environments and HTTP for remote deployments. Stdio suits desktop clients or CLI tools that launch the server process directly. HTTP, protected by bearer authentication, is how you expose the server to remote agents over the internet.
How do I know whether my MCP server is production-ready?
Discovering your tools locally, as in Step 10, confirms the server is technically sound. It does not tell you whether a real model, given an ambiguous request, calls the tool you intended. That requires model-in-the-loop evaluation, ideally run automatically across the clients your users actually connect from.
What is the difference between MCPJam and the MCP Inspector?
Inspector confirms a tool works when you call it with known arguments. MCPJam puts a real model in the loop and checks whether it makes the right call on its own, across your target clients and in CI. See Step 10 for a concrete example.
Are there platforms to test MCP servers simultaneously across different AI agents?
Yes. Continuous reliability infrastructure like MCPJam runs the same server against a maintained matrix of AI clients, so you can confirm that tools, resources, and prompts behave predictably regardless of which agent is calling them.
Which evaluation tools for MCP servers can integrate into a CI/CD pipeline?
Platforms like MCPJam provide continuous pre-production reliability infrastructure for MCP servers, ChatGPT Apps, and other agent-facing software. That includes protocol tracing, AI agent emulation across a maintained client matrix, deterministic evaluations, OAuth conformance testing, and automated CI/CD release gates.